Elastic stack Advent Calendar 9日目の記事になります。
はじめに
全文検索サーバーFessはバージョン10からElasticsearchを検索エンジンとして利用しています。Fessでは、Elasticsearchを全文検索エンジンとして使うためにいろいろとやっているので、Elasticsearch観点で紹介します。
インストール
Fessはここからダウンロードできます。現在の最新は10.3.1です。今回は、rpmをインストールすることにします。(簡単に試すのであれば、zip版でも良いです)
インストール手順はここに書いてあります。rpm版はelasticsearchのrpmを別途インストールする必要があるので、Fess 10.3に対応するElasticsearch 2.4.2をダウンロードしてインストールします。
# rpm -ivh elasticsearch-2.4.2.rpm
Fessで利用するためには以下の設定が必要になるので、/etc/elasticsearch/elasticsearch.ymlに以下を追加します。
configsync.config_path: /var/lib/elasticsearch/config
script.engine.groovy.inline.update: on
FessはElasticsearchをプラグインをインストールして拡張しています。
以下のプラグインをインストールしてください。
# /usr/share/elasticsearch/bin/plugin install org.codelibs/elasticsearch-analysis-fess/2.4.0
# /usr/share/elasticsearch/bin/plugin install org.codelibs/elasticsearch-analysis-ja/2.4.0
# /usr/share/elasticsearch/bin/plugin install org.codelibs/elasticsearch-analysis-synonym/2.4.0
# /usr/share/elasticsearch/bin/plugin install org.codelibs/elasticsearch-configsync/2.4.2
# /usr/share/elasticsearch/bin/plugin install org.codelibs/elasticsearch-dataformat/2.4.0
# /usr/share/elasticsearch/bin/plugin install org.codelibs/elasticsearch-langfield/2.4.1
#   /usr/share/elasticsearch/bin/plugin install org.codelibs/elasticsearch-analysis-kuromoji-neologd/2.4.1 -b
# /usr/share/elasticsearch/bin/plugin install http://maven.codelibs.org/archive/elasticsearch/plugin/kopf/elasticsearch-kopf-2.0.1.0.zip
次にFessのrpmをインストールします。
# rpm -ivh fess-10.3.1.rpm
あとは、サービス登録して、
# systemctl daemon-reload
# systemctl enable elasticsearch.service
# systemctl enable fess.service
FessとElasticsearchを起動します。
# systemctl start elasticsearch.service
# systemctl start fess.service
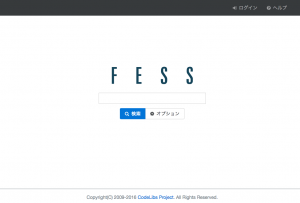
起動したら、ブラウザで http://localhost:8080/ にアクセスすると検索画面が表示されます。
クロール&インデクシング
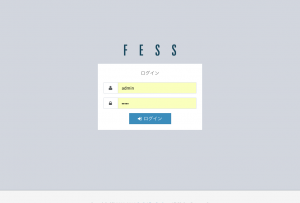
セットアップが完了したら、クロール&インデクシングして、検索できるようにしてみます。検索画面の右上の「ログイン」を選択するとログイン画面が表示されます。ユーザー名:admin、パスワード:adminでログインします。
まず、クロールの設定を作成します。今回はFessのサイトをクロールしてみます。左のメニューの「クローラ」の「ウェブ」を選択して、「新規作成」をクリックしてください。以下のように設定して保存します。
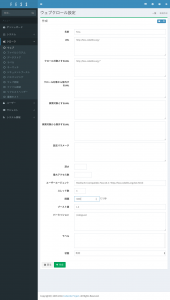
クロール対象とするURLを設定することで、指定した範囲でのクロールになります。間隔も3000ミリ秒に変更しています。3スレッドなので、この設定で各スレッドは3秒に1回ページを取得することになります。(3スレッド3秒間隔だと、結構時間がかかるので、最大アクセス数を100などに設定しても良いと思います)
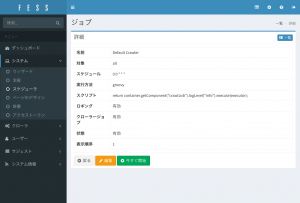
クロールの開始は、「システム」の「スケジューラ」を開き、「Default Crawler」を選択します。

「今すぐ開始」を押下することでクロールが開始します。最大アクセス数を指定していない場合は、かなり時間がかかります…。
「ダッシュボード」を開くと、インデックスの状況を確認することができます。下図の赤枠部分が検索用インデックスになります。
Fessでは、起動時にインデックスが存在しない場合は作成します。検索用のインデックス名はfess.[日付]になります。Fessのシステム上では、インデックス名でなく、エイリアス名でアクセスしています。検索時はfess.search、インデクシング時はfess.updateを利用しています。システム上でインデックス名を参照しないことで、analyzerを変えたい等のときに新しいインデックスに再インデクシングして、移行できたら、エイリアスを張り替えるだけで良いようにしています。検索とインデクシングのエイリアスを分けていたりもするので、様々なElasticsearchのクラスタ構成に対応できるようにしています。
ある程度、インデクシングできたら(上図のdocs数が検索対象数)、管理画面からログアウトして、検索してください。
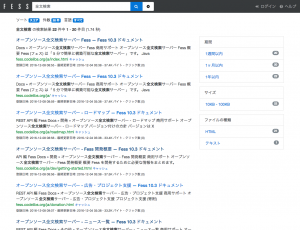
日本語環境のブラウザで「全文検索」を検索すると以下のようになります。
Query DSL
Fessが投げている検索がどのようなQuery DSLになっているか見てみましょう。
(結構、長いので、fields, aggregations, highlightの部分は割愛します…)
{
  "from": 0,
  "size": 20,
  "query": {
    "bool": {
      "must": {
        "function_score": {
          "query": {
            "bool": {
              "should": [
                {
                  "match": {
                    "title": {
                      "query": "全文検索",
                      "type": "phrase",
                      "boost": 0.2
                    }
                  }
                },
                {
                  "match": {
                    "content": {
                      "query": "全文検索",
                      "type": "phrase",
                      "boost": 0.1
                    }
                  }
                },
                {
                  "match": {
                    "title_ja": {
                      "query": "全文検索",
                      "type": "phrase",
                      "boost": 1
                    }
                  }
                },
                {
                  "match": {
                    "content_ja": {
                      "query": "全文検索",
                      "type": "phrase",
                      "boost": 0.5
                    }
                  }
                },
                {
                  "match": {
                    "title_en": {
                      "query": "全文検索",
                      "type": "phrase",
                      "boost": 1
                    }
                  }
                },
                {
                  "match": {
                    "content_en": {
                      "query": "全文検索",
                      "type": "phrase",
                      "boost": 0.5
                    }
                  }
                }
              ]
            }
          },
          "functions": [
            {
              "field_value_factor": {
                "field": "boost"
              }
            }
          ]
        }
      },
      "filter": {
        "bool": {
          "should": [
            {
              "term": {
                "role": "1guest"
              }
            },
            {
              "term": {
                "role": "Rguest"
              }
            }
          ]
        }
      }
    }
  }
}
Fessでは、検索対象のドキュメントとして、titleとcontentというプロパティにタイトルと本文を保存しています。ですので、検索画面から検索語を入力すると、「title:全文検索 OR content:全文検索」のような検索になります。さらに、ドキュメントはドキュメント自体の言語ごとに、title_[言語]とcontent_[言語]のプロパティを持っています。ですので、ブラウザが利用している言語が、日本語であれば、jaが加わり、、「title:全文検索 OR content:全文検索 OR title_ja:全文検索 OR content_ja:全文検索」という検索が行われます(実際には日本語ブラウザはenもだいたい持っているので、enも追加されます)。検索する際には以下の重みを付けて検索することで、検索スコアを調整しています(この重みはfess_config.propertiesで変更可能)。
また、ドキュメントにはboostプロパティも保持しているので、Function Queryでスコアに掛け合わせることで、ドキュメント単位のスコアを調整することもできます。boostプロパティの値はクロール設定で指定したものが入ります。
あとは、ロール検索があるので、filterで閲覧できるドキュメントをフィルタして表示しています。
インデックスの設定とマッピング
次にインデックスの設定とマッピングを見てみましょう。以下で表示することができます。zip版を利用している場合は、9201ポートになります。
$ curl localhost:9200/fess.search?pretty
結構、長いです…。
まず、fess.YYYYMMDD > mappings > dynamic_templatesで言語用のプロパティを定義しています。ですので、title_[言語]の名前で値を入れると、自動でここの定義が適用されます。日本語は以下になります。
          "lang_ja" : {
            "mapping" : {
              "type" : "string",
              "analyzer" : "japanese_analyzer"
            },
            "match" : "*_ja"
          }
japanese_analyzerが適用されます。
japanese_analyzerはsettings > analysis > analyzerにあります。
            "japanese_analyzer" : {
              "filter" : [ "truncate10_filter", "fess_japanese_baseform", "fess_japanese_stemmer", "japanese_pos_filter", "lowercase" ],
              "char_filter" : [ "mapping_ja_filter", "fess_japanese_iteration_mark" ],
              "type" : "custom",
              "tokenizer" : "japanese_tokenizer"
            },
いろいろなフィルタをかけていますが、トークナイズしているのはjapanese_tokenizerになります。
            "japanese_tokenizer" : {
              "mode" : "normal",
              "user_dictionary" : "/var/lib/elasticsearch/config/ja/kuromoji.txt",
              "reload_interval" : "1m",
              "type" : "fess_japanese_reloadable_tokenizer",
              "discard_punctuation" : "false"
            },
typeがfess_japanese_reloadable_tokenizerになっていますが、Fessではanalysis-fessプラグインを入れることで、
-
-
analysis-kuromoji-neologdプラグインがインストールされていれば、NEologdのKuromojiが適用される
-
上記がなければ、普通のKuromojiが適用される
という感じの自動判定して切り替える仕組みを適用しています。ですので、普通に利用される場合は、kuromoji_neologd_tokenizerまたはkuromoji_tokenizerに置き換えて考えてください(reload_intervalもなくしてください)。これにより、title_jaとcontent_jaは形態素解析のプロパティのインデックスができます。
次にtitleとcontentのマッピングを見てみましょう。
          "title" : {
            "type" : "langstring",
            "term_vector" : "with_positions_offsets",
            "analyzer" : "standard_analyzer",
            "lang_field" : "lang",
            "lang_base_name" : ""
          },
          "content" : {
            "type" : "langstring",
            "term_vector" : "with_positions_offsets",
            "analyzer" : "standard_analyzer",
            "lang_field" : "lang",
            "lang_base_name" : ""
          },
typeが見慣れないlangstringという型になっていると思います。これはlangfieldプラグインで拡張した型になります。langstring型は言語判定をして、copy_toをしてくれる便利な型になります。これにより、インデクシング時には、title_jaなどに自分で入れなくても、titleとcontentだけに値を入れておけば、いい感じに*_[言語]のフィールドをコピーして作成します。ただ、自動判定で言語判定に失敗するケースがそこそこあるので、lang_fieldプロパティで明示的に指定することでその値を用いることも可能です(language-detectionをフォークしているのですが、精度問題があるので、より良いものがあれば教えてもらえると助かります)。
まとめ
Fessでは、上記のような感じでElasticsearchを利用しています。langstringなど、特殊なものもありますが、自前でやる場合はcopy_toやマルチフィールドなどでの対応も可能だと思います。FessはSolrの時代からAnalyzerの定義に取り組んでいるので、今回の説明した以外にもいろいろとやっているかと思います。ノウハウなどもいろいろとあるかと思うので、参考にしていただくなどしていただければと。
